I'm editing quite a long complex book at present, and we want to be able to see the contents at a glance simply in a text outline and move them around.
Each chapter is a separate file, with the headings marked up using Word's Styles. But simply viewing as Outline doesn't do what we want - any kind of copy and paste means all the text comes as well. Using the standard Insert ToC (Table of Contents) gives page numbers too, which aren't needed.
Here's the solution I found.
1. Insert a new page at the top of the file (Insert Page Break or Section Break if you want to retain the existing page numbering)
2. Click the Document Elements tab in the ribbon bar.
3. Click Table of Contents - see a variety of styles, remember which you prefer but don't click it (if you do you will get it automatically generated but complete with page numbers)
4. Instead, click the Settings cogwheel, and see the styles listed. Then untick Show page numbers, (bottom left). You can also set other preferences if you want to.
5. Click OK - and there's your ToC with no page numbers, but it's greyed.
Then if you want the Contents as an outline in a completely new file, you can:
- Print the current page - it will print on paper without the grey
or
- Print the current page but save it or view it as a PDF in the print dialogue
or
- Highlight and copy the ToC,
- Open a new blank Word document
- Edit > Paste Special > Styled text
Wow! your outline in a completely new document. The font may not be the same but that's easily changed in the usual way.
Showing posts with label Word. Show all posts
Showing posts with label Word. Show all posts
Friday, 21 August 2015

Wednesday, 16 October 2013
PowerPoint into Word
Don't you feel frustrated that you can print out a Handouts file from your PPT presentation with neat lines beside the little slide images, but not type your speaking notes into that useful slot?
Simply by chance, I found a solution.

Oh my goodness! There is your slide in your Word file! It'll be too large but grab a resize handle and just make it smaller. Then you can type your notes into the table cell beside it.
 The Word file will be massive, because all the images are saved at full size. You can reduce the Word file size by File > Reduce file size. This allows you to convert images to lower resolution, which won't matter for such small images. You can also do this for your PPT file but be careful you don't reduce the display quality.
Another route, takes a bit longer, is: in the PPT file, do File > Save as Pictures. That will make a folder with a jpeg image of each file. You can easily copy or drag each image into a Word file, and you could convert all the images to smaller dimensions first if you wanted to, in Preview or using image software such as Photoshop Elements to batch process.
Simply by chance, I found a solution.

- Open up your PPT presentation in Normal view
- Open up a Word file and make a table 2 columns wide by however many rows long.
- In the PPT presentation, click on the little slide image and Copy it (cmd-C, or using a menu, as you wish)
- In the Word file, click in a table cell, and Paste the copied image - cmd-V or using a menu

Another route, takes a bit longer, is: in the PPT file, do File > Save as Pictures. That will make a folder with a jpeg image of each file. You can easily copy or drag each image into a Word file, and you could convert all the images to smaller dimensions first if you wanted to, in Preview or using image software such as Photoshop Elements to batch process.
Monday, 12 December 2011
Word for Mac 2011: sum table cells including blanks
Whoo, another Cracked-it moment!
Field can be one of several useful items including word count, total etc.
Only snag is, the Field doesn't update automatically. To update it place the cursor in the field and right click - from the pull down menu, an option is Update field.
Word 2011 for Mac - just acclimatising. At last an improvement on the previous version, except Help seems non-existent, even online. Whatever happened to the manual?
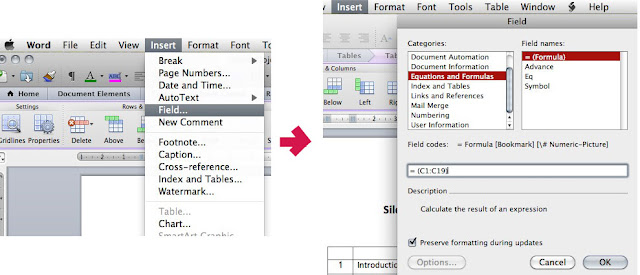
In a table, how to sum a column (or row) of figures that contains blank cells? AutoSum only adds up the immediate filled cells.
Put the cursor in the table cell where you want the total.
Top menu bar, go to Insert, then Field.
Type your required range in, e.g. =SUM(C1:C10).
Press return, and voila!
Field can be one of several useful items including word count, total etc.
Only snag is, the Field doesn't update automatically. To update it place the cursor in the field and right click - from the pull down menu, an option is Update field.
Subscribe to:
Posts (Atom)
