I'm always so pleased when I find a way round some exasperating computer problem that I thought I'd share my moments of triumph ...

Monday 12 December 2011

Word for Mac 2011: sum table cells including blanks

Whoo, another Cracked-it moment!

Word 2011 for Mac - just acclimatising. At last an improvement on the previous version, except Help seems non-existent, even online. Whatever happened to the manual?

In a table, how to sum a column (or row) of figures that contains blank cells? AutoSum only adds up the immediate filled cells.

Put the cursor in the table cell where you want the total.
Top menu bar, go to Insert, then Field.
Type your required range in, e.g. =SUM(C1:C10).
Press return, and voila!

Field can be one of several useful items including word count, total etc.
Only snag is, the Field doesn't update automatically. To update it place the cursor in the field and right click - from the pull down menu, an option is Update field.

Monday 31 October 2011

How to stop annoying ads when you're browsing

I found the same annoying ads popping up whichever website I browsed to, and in all browsers too. Specially annoying as one was from a company that had provided very poor service.

Guess what, Google thinks it knows what you're interested in and provides these annoyances specially for you! However, you can stop it. Go to:
http://www.google.com/ads/preferences/
and you can switch them off.

Thursday 18 August 2011

Twitter - how to optimise your profile image

Our little Twitter profile identity image looked great on normal screens, but on the iPhone it was sadly blurry. There doesn't seem to be any Help guidance on optimal size/resolution so it was over to trial and error.

The largest Twitter profile image size is 250 px square.

We found that an image this size saved as 72 dpi (standard screen resolution) or even 150 dpi still looked blurry on the iPhone.

What worked was an image 400 px square, and 300 dpi resolution (the normal resolution for print). See for yourself! http://twitter.com/#!/EVAlondonConf


Thursday 28 July 2011

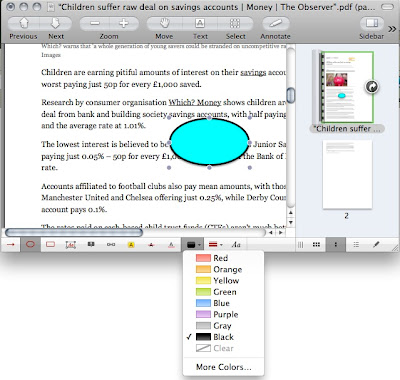
Preview - two ways to format annotations

a) The "normal" way, using the Tools menu bar at the bottom. You get this menu bar when you select (at the top) Tools > Annotate (any option)


b) The obscure way with more options, using the Tools inspector under Tools in the top menu


Does all this seem complicated? I never said it was simple! That's why I had my moment of triumph ...

Tuesday 26 July 2011

Mac - Preview annotations options

Do you drive a Mac? If so you probably find Preview extremely useful. Here's how to do some extra smart things.

More options for the appearance of annotations - text, oval, rectangle, line:
  • Click Tools > Annotate > Add text
  • In the menu at the bottom of the screen, click on the little Text square
  • Click and drag on the screen and type the text.
  • Next, here is the magic bit, with the text box selected, go to Tools > Show inspector (or cmd-i)
  • At the top of the Inspector box, click the pencil icon top right
  • The pull-down list next to Text style then offers various options - Outline, Bordered, Speech bubble, Thought bubble
  • You can adjust the line thickness, line colour and fill colour if you select one of these.
You get similar choices if you click Show inspector for other annotation choices such as Rectangle or Oval, and indeed Line - at last, how to get rid of the arrows.

Thursday 9 June 2011

How to embed a Googledoc in your web page

It's easy once you have found the vital menu item - as so often. See http://bit.ly/kTRx5i for instance.

Seems it's only spreadsheets you can actually embed in a page.

1. With your GoogleDoc spreadsheet open, click the little arrow beside Share in the top R. corner. Select Publish as a web page.
2. Select which sheets to publish. For neat results name the tab for your chosen page simply . . It shows as part of the title when embedded.
3. Click Start publishing.
4. Then, under Get link to published data, select HTML to embed in a page.
5. Select and copy the code in the window.
6. Go to your web page and paste the code into the html. (you might need to enclose it in "code" and "/code" - these are enclosed in pointy brackets in the usual way.

There! When you view your web page the contents of the sheet show in a frame.


Wednesday 27 April 2011

Converting Kindle books for different readers

Can you read Kindle e-books on your Sony 650? yes you can. You need the Calibre free software (absolutely brilliant, do donate if you use it). It converts lots of e-book formats to whatever e-reader you have.

I didn't buy many e-books from Amazon for my briefly owned Kindle. However, Amazon has by far the widest range and you can still buy Kindle books via the Kindle app to read via PCs, Macs etc.


Then the plugin tools (including instructions) for Calibre are linked from here: https://apprenticealf.wordpress.com/2010/02/11/hello-world/

It works!

Sunday 10 April 2011

iPhone synching challenges

iPhone 3GS -
Is iTunes on your PC, or hopefully Mac, telling you that synching will remove half your hard won apps? You probably need to go to:
file > Transfer purchases from iPhone
first to get them backed up onto the computer.

They really know how to conceal these things, don't they.

Saturday 2 April 2011

Griffin's iMic - recording from vinyl - problem solved

Computer: MacBook Pro 7.1
Mac OS X 10.6 (Snow Leopard)
Product: iMic
The iMic is a device that plugs into a USB slot to "enable high-quality recording and playback for your Mac or PC".

Problem

Trying to record from a turntable via a hi-fi headphone jack port.
I previously used the iMic perfectly fine to digitally record music from vinyl records via Audacity, onto a 2009 MacBook, which had separate audio input and output ports. Now with a new MacBook Pro 7.1, with a single combined input/output audio port (not a helpful feature), I got no sound input.
  • The iMic is plugged into a USB slot.
  • The line from the record player headphoneport is plugged into the iMic In port
  • The iMic input switch is set to Line (not Mic)
  • On the MacBook, the Sound input is set to iMic (it knows it's there)
  • Audacity allows playthrough during recording, so sound output is set to Inbuilt.
Audacity doesn't seem to know that the iMic is there as there is no option to use it as input (on the old MacBook it did)
I can record and playthrough using a line simply connecting the record player headphone port to the MacBook audio port and not using the iMic.

Solution

The connection setup above is correct, but you need to set three sets of preferences etc.

1 Run the Mac system prefs > Sound: Input via iMic, Output via Built in
2 Then, you need to run Audio MIDI Setup (Applications > Utilities) as well.
Select the iMic from the left hand side panel.
Then set both the input and the output to 16bit 2 channel 44100Hz.
3 Next, in the Audacity Preferences:
- select the Audio I/O tab.
- Set the Playback device as 'Built In Audio',
- set the Recording device as 'iMic USB Audio System' and -
- channels as '2 (Stereo)'.
Then, down at the bottom,
- select Hardware and Software Playthrough.
Click OK to make those settings.

One more thing - check System preferences > Sound > Output tab. There's a pull-down selection: Use audio port for: Sound input / Sound output. It should be Sound input for this purpose. (If you subsequently can't get output to headphones, the TV etc check this). I think this is a real pain, can we just have an input port and an output port please Apple.

It worked for me! - although I subsequently had to set the Audacity preferences again.