Yes you can! it may take a bit of fiddling but although I would love to resist Amazon's world domination project, I find Amazon format books are both cheaper and also better formatted for reading.
Apprentice Alf is the leader in this dark art, in his blog, http://apprenticealf.wordpress.com/ (see his comment on this post, below). You will find useful discussion and links to the up to date conversion tools there.
The current tools are here: http://www.datafilehost.com/download-a28d695b.html: download and unzip the folder. Don't be daunted by the technical chat, just follow the instructions in the ReadMe files.
To free up Amazon e-books (this is on a Mac, there are similar facilites for a Windows pc) - move the zip file DeDRM_5.0.app.zip onto your desktop (or other convenient folder), click it to unpack to a curly icon DeDRM 5.0.app.
Your Kindle book files are in My Kindle Content. They don't have helpful titles, but sort them by date, and it's the .azw file that is the book. Drag this onto the curly icon and it will save a freed up copy of the book for you. You should be able to upload that to your reader, via the free Calibre software or even via your normal reader software.
Calibre is very handy, search to download it for free (be fair, do donate). Once Calibre is installed, you can install the DeDRM plugins:
Open Calibre preferences > Plugins > button at the bottom, Install plugin from file > Navigate to the DeDRM folder with the Calibre plugins > click on one to install it
Repeat until all are installed. Restart Calibre.
Then, you can just add the book file to the Calibre library and upload it to your device - select Autoconvert and it will do the conversion as part of the process.
Monday, 16 April 2012

Tuesday, 3 April 2012
iPhone - delete apps from both computer and iPhone
Quite a few queries online about this.
Refers to a Mac.
Assumes iTunes is open and your iPhone is plugged into your computer.
I must just have a quick rant: I HATE the way that "synch" works - one cannot tell which set of data are being synched to what, which data are being synched ... I could go on ... clearly Steve never had much to do with the software aspects of his desirable kit.
Anyway, look at the top of the iTunes menu under Library and you'll see Apps. Click that and you have 2 views of your apps, either Apps (all of them) or Genres (inconvenient in my opinion).
Left click on an app and one option is Delete. Also you can Show in finder, and I suppose delete it from the list of files as well.
You also need to delete it from the iPhone or else it will simply copy it back to your computer next time you "synch". To do this, hold your finger on the app on the iPhone screen and then press the little cross in the corner of the icon.
Refers to a Mac.
Assumes iTunes is open and your iPhone is plugged into your computer.
I must just have a quick rant: I HATE the way that "synch" works - one cannot tell which set of data are being synched to what, which data are being synched ... I could go on ... clearly Steve never had much to do with the software aspects of his desirable kit.
Anyway, look at the top of the iTunes menu under Library and you'll see Apps. Click that and you have 2 views of your apps, either Apps (all of them) or Genres (inconvenient in my opinion).
Left click on an app and one option is Delete. Also you can Show in finder, and I suppose delete it from the list of files as well.
You also need to delete it from the iPhone or else it will simply copy it back to your computer next time you "synch". To do this, hold your finger on the app on the iPhone screen and then press the little cross in the corner of the icon.
Monday, 12 December 2011
Word for Mac 2011: sum table cells including blanks
Whoo, another Cracked-it moment!
Field can be one of several useful items including word count, total etc.
Only snag is, the Field doesn't update automatically. To update it place the cursor in the field and right click - from the pull down menu, an option is Update field.
Word 2011 for Mac - just acclimatising. At last an improvement on the previous version, except Help seems non-existent, even online. Whatever happened to the manual?
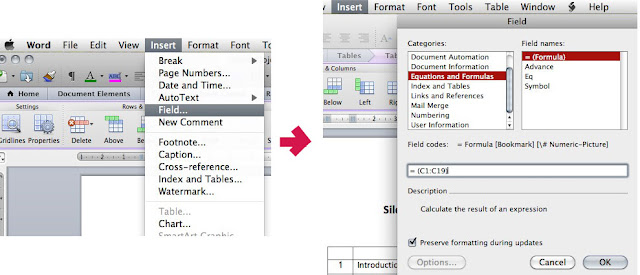
In a table, how to sum a column (or row) of figures that contains blank cells? AutoSum only adds up the immediate filled cells.
Put the cursor in the table cell where you want the total.
Top menu bar, go to Insert, then Field.
Type your required range in, e.g. =SUM(C1:C10).
Press return, and voila!
Field can be one of several useful items including word count, total etc.
Only snag is, the Field doesn't update automatically. To update it place the cursor in the field and right click - from the pull down menu, an option is Update field.
Monday, 31 October 2011
How to stop annoying ads when you're browsing
I found the same annoying ads popping up whichever website I browsed to, and in all browsers too. Specially annoying as one was from a company that had provided very poor service.
Guess what, Google thinks it knows what you're interested in and provides these annoyances specially for you! However, you can stop it. Go to:
http://www.google.com/ads/preferences/and you can switch them off.
Thursday, 18 August 2011
Twitter - how to optimise your profile image
Our little Twitter profile identity image looked great on normal screens, but on the iPhone it was sadly blurry. There doesn't seem to be any Help guidance on optimal size/resolution so it was over to trial and error.
The largest Twitter profile image size is 250 px square.
We found that an image this size saved as 72 dpi (standard screen resolution) or even 150 dpi still looked blurry on the iPhone.
What worked was an image 400 px square, and 300 dpi resolution (the normal resolution for print). See for yourself! http://twitter.com/#!/EVAlondonConf
Thursday, 28 July 2011
Preview - two ways to format annotations
a) The "normal" way, using the Tools menu bar at the bottom. You get this menu bar when you select (at the top) Tools > Annotate (any option)


Does all this seem complicated? I never said it was simple! That's why I had my moment of triumph ...
Tuesday, 26 July 2011
Mac - Preview annotations options
Do you drive a Mac? If so you probably find Preview extremely useful. Here's how to do some extra smart things.
More options for the appearance of annotations - text, oval, rectangle, line:
More options for the appearance of annotations - text, oval, rectangle, line:
- Click Tools > Annotate > Add text
- In the menu at the bottom of the screen, click on the little Text square
- Click and drag on the screen and type the text.
- Next, here is the magic bit, with the text box selected, go to Tools > Show inspector (or cmd-i)
- At the top of the Inspector box, click the pencil icon top right
- The pull-down list next to Text style then offers various options - Outline, Bordered, Speech bubble, Thought bubble
- You can adjust the line thickness, line colour and fill colour if you select one of these.
Thursday, 9 June 2011
How to embed a Googledoc in your web page
It's easy once you have found the vital menu item - as so often. See http://bit.ly/kTRx5i for instance.
Seems it's only spreadsheets you can actually embed in a page.
1. With your GoogleDoc spreadsheet open, click the little arrow beside Share in the top R. corner. Select Publish as a web page.
Seems it's only spreadsheets you can actually embed in a page.
1. With your GoogleDoc spreadsheet open, click the little arrow beside Share in the top R. corner. Select Publish as a web page.
2. Select which sheets to publish. For neat results name the tab for your chosen page simply . . It shows as part of the title when embedded.
3. Click Start publishing.
4. Then, under Get link to published data, select HTML to embed in a page.
5. Select and copy the code in the window.
6. Go to your web page and paste the code into the html. (you might need to enclose it in "code" and "/code" - these are enclosed in pointy brackets in the usual way.
There! When you view your web page the contents of the sheet show in a frame.
Subscribe to:
Posts (Atom)
