I'm always so pleased when I find a way round some exasperating computer problem that I thought I'd share my moments of triumph ...
Showing posts with label Mac. Show all posts

Monday, 10 November 2014

How to revert to iTunes 11 if you don't like iTunes 12

Some reviewers think iTunes 12 is "Apple's worst software ever" because of the visually incoherent way it presents information on your media collection - in particular, the complete lack of the sidebar, where media were listed by category.

I agree - but luckily, if you have accepted the iTunes 12 "upgrade" you can fairly easily go back to iTunes 11. Here are very clear instructions, from MacWorld repeated on the LifeHacker blog.

First off, download copies of AppZapper and Pacifist , backup your computer, then create an installer with Pacifist. (Pacifist allows you to unpack .dmg installation packages and extract individual files and folders. Not something one needs to do every day! but in this case it's just the job.)
  1. Quit iTunes 12 and launch AppZapper
  2. Open AppZapper's preferences and uncheck"Keep Apple Applications Safe"
  3. Drag the iTunes 12 icon from the Application folder to AppZapper and click the "Zap!" button
  4. Download iTunes 11 - from the Apple support site
  5. Open up Pacifist and drag the iTunes 11 DMG file into it. 
  6. Select "Contents of Install iTunes" and then click "Install"
  7. Navigate to your iTunes folder. Within that find the iTunes library and then find the iTunes LIbrary.itl file. Drag it to your desktop or to the trash.
  8. Launch iTunes 11.
Done.
- Actually, not quite! Where is my iTunes music and media? Apple support gives the following instructions for retrieving it:

Re-creating the iTunes Library file

Note: After re-creating your library, any devices that you sync with iTunes (Apple TV, iPod, iPhone, iPad) will see your iTunes library as a new library and will completely resync. The next sync with such a device will take longer and may reset some options since your rebuilt library isn't familiar to the device.

1. Quit iTunes.
2. Locate your iTunes folder (this is the folder that contains the iTunes Library and iTunes Library.xml files).
Operating System Default location of iTunes Folder
Mac OS X /Users/[your username]/Music
Microsoft Windows XP \Documents and Settings\[your username]\My Documents\My Music\
Microsoft Windows Vista \Users\[your username]\Music\
Microsoft Windows 7 \Users\[your username]\My Music\
3. Open your iTunes folder.
4. Drag the "iTunes Library.xml" or "iTunes Music Library.xml" file to the Desktop. If neither is available, learn how to add files back to the Library (because the XML file is not available, playlists and other information will not be available).
5. Drag the following file from your iTunes folder to the Trash:
Mac OS X "iTunes Library" or "iTunes Library.itl"
Microsoft Windows "iTunes Library.itl"
6. Open iTunes.
Important: Do not add any content into iTunes at this point (such as by purchasing something from the iTunes Store).
7. Choose File > Library > Import Playlist.
8. Navigate to the "iTunes Library.xml" file on the Desktop.
  • Mac users: Click Choose.
  • Windows users: Click Open.
If your Podcasts list in iTunes is empty after following these steps, learn how to add them back into iTunes.

Hooray, it's all back.

Doubtless Apple will try to "upgrade" you to iTunes 12 with every software update. Click Details instead of automatically accepting and you'll be able to avoid the horrid thing.

Saturday, 30 March 2013

Use your Google calendars on your iPhone


If you use Google's calendar you can synch it with your iPhone's built in calendar (which I must say, is a really nice app). You don't have to use Apple's Cloud, or be restricted to iCal on your Mac.

Google has now provided instructions (spoken, even!) for synching your mobile device calendar with Google's, including iPhone. Better late than never.

Here's how:

1: Set up a Google Calendar account on the iPhone

On your iPhone go to:
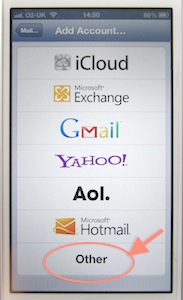
Settings> Mail, contacts, calendars > Add account > Other > Add CalDAV account
Then:
  • Server is google.com
  • User name is your Google user name (the email address or whatever that you sign in with), 
  • Password is your Google account password,
  • Description is optional. 
Then cllick Advanced settings and make sure SSL is On.

2: In Google, select the calendars you want on your iPhone

I noticed that not all my different calendars were showing. So:
  • Open a mobile browser and go to this url: https://www.google.com/calendar/syncselect
  • Sign into Google with your user email and password. 
  • On the list of your calendars, check those that you want on your iPhone.
Done! it works!

3: Set your preferred Google calendar to be the default

Entries added on my iPhone weren't getting through initially - because it had decided to use the inbuilt Birthdays as the default calendar.
  • Go back to Settings > Mail, contacts, calendars > and scroll down to Calendars > Default calendar.
  • You'll see a list of those available. Delete any that aren't on your Google calendar and select the one you want to be your default.
You can also delete all the extraneous additional 'calendars' (that the iPhone is born with, I suppose).

4: Select on your iPhone the calendars you want to see

  • Return to the home screen and go to Calendar.
  • In any view, go to Calendars (top left of the screen) and from the list select those you want it to show on your iPhone. Then you can click the Refresh button bottom left.
After about half a day searching Google for answers, my iPhone does now perfectly synch iPhone < > Google calendar < > desktop Mac, both ways throughout. Solved!
(On my MacBook / iMac I like to use Mozilla's Sunbird with the Provider add-on, but that's a different story.)

PS: Searches on Google didn't throw up the iPhone manual as a possible source of answers, but it is fairly helpful although not as detailed. I'm not sure it gives the complete answer.


Saturday, 23 February 2013

iPhone calendar - even better, Fantastical

While we're on calendars, I thought the iCal one was fine on the iPhone until I found Fantastical (£1.99 I think). It's an app that simply provides a new calendar interface. Just install Fantastical on your iPhone and it will ask you to give it permission to use your calendars (provided you have linked to them as in the previous posts). Then they, fantastically, appear.


Dates will display across the top of the screen - pull down the tab for a monthly view. Pull down again to return to the list. Scroll around very quickly and nicely - all sorts of other refinements. Nice.

Saturday, 16 February 2013

iPhone calendar - show public holidays

The previous post dealt with synching iPhone's calendar with Google calendar, but following that process you don't get public holidays showing.

Here's how to do that.

First do Stage 1 on your iPhone:
Settings> Mail, contacts, calendars > Add account > Other > only this time, select Add subscribed calendar.

Then, the server is whatever public holiday calendar you wish. I used Apple's purely because it's easy to find the server address:
ical.mac.com/ical/UK32Holidays.ics

For US public holidays, it's
ical.mac.com/ical/US32Holidays.ics

Or if you're using Google calendars anyway, here's Google's:
https://www.google.com/calendar/ical/uk__en%40holiday.calendar.google.com/public/basic.ics


Friday, 2 November 2012

Mac - 2 useful applications

If you can remember way back on Macs, they used to show a little icon top R. on the screen to show what application you were in at the time. Well handy, doubtless why Apple abolished this useful feature a long time ago.


However, thanks to Eerko Vissering for developing the little application called Focus, which does the same thing. I've used it with Leopard / Snow Leopard for ages. Eerko has updated it to run on Lion / Mountain Lion. Thanks Eerko!

http://www.macupdate.com/app/mac/11356/focus
http://eerko.nl/software/


Another application I use all the time is QuickApps. This puts a little icon in your menu bar - click on it to show a dropdown list of all your applications.

http://download.cnet.com/QuickApps/3000-2344_4-201757.html


Thursday, 1 November 2012

Preview / Mountain Lion - print selected pages solved

Huh! after much whinging - Yes! one can print just selected pages in Preview. So simple:
  • Open a pdf file, or several pdf files, in Preview
  • Set it to display thumbnails of the pages in the Sidebar (under View)
  • Select the thumbnails of the pages you'd like to print, in the usual ways. You can select pages in several different pdfs, or indeed all the pages in different pdfs. A way to combine images into one pdf file.
  • Tell it to Print - either cmd-P or File > Print
There! in the print dialogue box, you'll see an option: Selected pages in sidebar.

Then you can either print just the pages you want, or save them as a new pdf.


If you're still in Snow Leopard (OS 10.6) then to print selected pages, select as above, and the command is in the File menu below Print.

Monday, 25 June 2012

MacBook Air drops WiFi connection - solved

We had to change the wifi security to WEP to accommodate a primitive PC laptop. After that I had to re-log in to the wifi network every time it woke up. Absolutely maddening.

Lots of internet searching and different solutions later, eg delete network and re-add it, etc. Finally a sensible suggestion from someone: Run Repair Permissions from disk utility.

Problem solved, connection drops no more. So simple!

A few weeks later ...

This is from me! I really was doubtful that the solution could be that simple, but my MacBook Air was dropping the connection again, this time to a brand new BT HomeHub router.

So I ran Permissions Repair and guess what, it's fixed again! Hope it lasts.

And subsequently ...

Dropped again - this time I just did "turn WiFi off" from the top menu bar, and then on again, and it picked up again.

Tuesday, 26 July 2011

Mac - Preview annotations options

Do you drive a Mac? If so you probably find Preview extremely useful. Here's how to do some extra smart things.

More options for the appearance of annotations - text, oval, rectangle, line:
  • Click Tools > Annotate > Add text
  • In the menu at the bottom of the screen, click on the little Text square
  • Click and drag on the screen and type the text.
  • Next, here is the magic bit, with the text box selected, go to Tools > Show inspector (or cmd-i)
  • At the top of the Inspector box, click the pencil icon top right
  • The pull-down list next to Text style then offers various options - Outline, Bordered, Speech bubble, Thought bubble
  • You can adjust the line thickness, line colour and fill colour if you select one of these.
You get similar choices if you click Show inspector for other annotation choices such as Rectangle or Oval, and indeed Line - at last, how to get rid of the arrows.