It's taken far too long for me to realise this. When you take a screen grab using one of the methods Apple describes (see this blog, below and this useful article , the image is saved to the clipboard.
I have been opening Preview and doing cmnd-n to see the screen shot in a new Preview window. Then it can be saved as an image in whatever format you please. But if you want to paste the screen shot straight into a word processing document or a presentation then you can simply do cmd-v or Paste from the top menu, and there will be your image.
Wednesday, 26 October 2016

Monday, 4 January 2016
Use your custom icon in the Dock
Maybe you've added a distinctive icon to a folder, but when dragged into the Dock all you see is the plain folder icon? Or sometimes, oddly, the icon for an item inside the folder? To see your nice new icon in the Dock, make an alias to the folder and add a custom icon to the alias. Then drag the alias into the dock, and there's your attractive special icon. Click on it and it takes you to the contents of the folder.
Monday, 14 December 2015
List view folders in Dock
If you put a folder in the Dock for easy reference, are you annoyed by the default Stack view? If there are more than a handful of files in the folder this is impractical. Who do they design these operating systems for?
Here's the answer: right click on a folder that's in the Dock and you get options for viewing it, including Folder and List view.
Here's the answer: right click on a folder that's in the Dock and you get options for viewing it, including Folder and List view.
Thursday, 3 December 2015
Change default screenshot format
Mac screenshots by default save in .png format. Would you prefer the default format to be JPG, or something else? Here's the simple way to change it.
From Finder, launch Terminal:
top menu Go > Utilities > Terminal
Copy and past in the following line, it's a single line with no break:
defaults write com.apple.screencapture type jpg;killall SystemUIServer
Want a different format? In this line of code, replace jpg with one of the following:
gif
PDF
png
tiff
Friday, 25 September 2015
Get back Save As... in Preview and other Apple menus
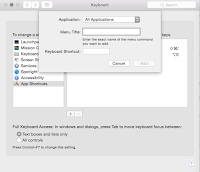
Driven to distraction by Apple dropping Save As... from its app menus? The over complicated Versions function is absolutely not the answer? After 2 years, or is it 3, of irritation I have found the extremely simple! way to permanently bring back Save As... to its proper menu place.
1. Open System Preferences
2. Click Keyboard, then the Shortcuts tab
3. Click App Shortcuts
4. Click + to add a new shortcut
5. In the dialogue box, select All applications or just the one you want to fix
6. Menu title must be exactly as here: Save As...
Note the three stops, and no space after As
7. Type a keyboard shortcut - for Save As... I used Alt-s , I thought memorable
8. Then just close the box, and like magic, Save As... appears in its rightful file menu place. And you can use your keyboard shortcut too.
I can't believe how long I've spent awkwardly holding down Alt while clicking File in order to be offered Save As... . So simple.

1. Open System Preferences
2. Click Keyboard, then the Shortcuts tab
3. Click App Shortcuts
4. Click + to add a new shortcut
5. In the dialogue box, select All applications or just the one you want to fix
6. Menu title must be exactly as here: Save As...
Note the three stops, and no space after As
7. Type a keyboard shortcut - for Save As... I used Alt-s , I thought memorable
8. Then just close the box, and like magic, Save As... appears in its rightful file menu place. And you can use your keyboard shortcut too.
I can't believe how long I've spent awkwardly holding down Alt while clicking File in order to be offered Save As... . So simple.


Wednesday, 2 September 2015
Properly resize Excel windows for laptop screen
I work with the same Excel spreadsheets on my iMac and my Mac laptops. When Yosemite came along suddenly the spreadsheet was too large to fit the laptop screen and the tabs at the bottom were not visible.
There are various complicated workarounds but finally here is a simple answer:
Just click Window in the top menu bar and select Zoom window. A real moment of triumph, that.

There are various complicated workarounds but finally here is a simple answer:
Just click Window in the top menu bar and select Zoom window. A real moment of triumph, that.

Friday, 21 August 2015
Apple AppStore - can't download purchases
Well! Solved at last after literally hours of expert Apple support phone calls. Very grateful to Apple support, absolutely outstanding, but I finally twigged myself what the answer was.
Reverting to iTunes 11 had prevented me downloading apps or updates to ones I had already purchased. System updates downloaded fine but I was unable to download 3rd party application updates and even Apple's own software purchases such as Pages, Keynote and Numbers.
Finally, I installed iTunes 12 - problem gone!
Not sure I can live with iTunes 12, but I could still go back to iTunes 11 again as in my earlier instructions.
Reverting to iTunes 11 had prevented me downloading apps or updates to ones I had already purchased. System updates downloaded fine but I was unable to download 3rd party application updates and even Apple's own software purchases such as Pages, Keynote and Numbers.
Finally, I installed iTunes 12 - problem gone!
Not sure I can live with iTunes 12, but I could still go back to iTunes 11 again as in my earlier instructions.
Word for Mac 2011 - Create a Table of Contents without text or page numbers
I'm editing quite a long complex book at present, and we want to be able to see the contents at a glance simply in a text outline and move them around.
Each chapter is a separate file, with the headings marked up using Word's Styles. But simply viewing as Outline doesn't do what we want - any kind of copy and paste means all the text comes as well. Using the standard Insert ToC (Table of Contents) gives page numbers too, which aren't needed.
Here's the solution I found.
1. Insert a new page at the top of the file (Insert Page Break or Section Break if you want to retain the existing page numbering)
2. Click the Document Elements tab in the ribbon bar.
3. Click Table of Contents - see a variety of styles, remember which you prefer but don't click it (if you do you will get it automatically generated but complete with page numbers)
4. Instead, click the Settings cogwheel, and see the styles listed. Then untick Show page numbers, (bottom left). You can also set other preferences if you want to.
5. Click OK - and there's your ToC with no page numbers, but it's greyed.
Then if you want the Contents as an outline in a completely new file, you can:
- Print the current page - it will print on paper without the grey
or
- Print the current page but save it or view it as a PDF in the print dialogue
or
- Highlight and copy the ToC,
- Open a new blank Word document
- Edit > Paste Special > Styled text
Wow! your outline in a completely new document. The font may not be the same but that's easily changed in the usual way.
Each chapter is a separate file, with the headings marked up using Word's Styles. But simply viewing as Outline doesn't do what we want - any kind of copy and paste means all the text comes as well. Using the standard Insert ToC (Table of Contents) gives page numbers too, which aren't needed.
Here's the solution I found.
1. Insert a new page at the top of the file (Insert Page Break or Section Break if you want to retain the existing page numbering)
2. Click the Document Elements tab in the ribbon bar.
3. Click Table of Contents - see a variety of styles, remember which you prefer but don't click it (if you do you will get it automatically generated but complete with page numbers)
4. Instead, click the Settings cogwheel, and see the styles listed. Then untick Show page numbers, (bottom left). You can also set other preferences if you want to.
5. Click OK - and there's your ToC with no page numbers, but it's greyed.
Then if you want the Contents as an outline in a completely new file, you can:
- Print the current page - it will print on paper without the grey
or
- Print the current page but save it or view it as a PDF in the print dialogue
or
- Highlight and copy the ToC,
- Open a new blank Word document
- Edit > Paste Special > Styled text
Wow! your outline in a completely new document. The font may not be the same but that's easily changed in the usual way.
Monday, 19 January 2015
Screen shots in Macs - a really useful guide
I'll be coming back to this one for sure, an excellent clear guide to various ways to take screen shots, relevant to OS X 10.10 Yosemite backwards.
http://www.computerworld.com/article/2476025/mac-os-x/os-x--taking-better-screenshots-on-a-mac.html
The main screen grabs are these, but do look at the full article, it's so informative.
⌘+⇧+3: Capture entire screen and save as a file.
⌘+Ctrl+⇧+3: Capture entire screen and copy to the clipboard.
⌘+⇧+4: Capture dragged area and save as a file.
⌘+ctrl+⇧+4: Capture dragged area and copy to the clipboard.
⌘+⇧+4 then Space: Capture a window, menu, desktop icon, or the menu bar and save as a file.
⌘+Ctrl+⇧+4 then Space: Capture a window, menu, desktop icon, or the menu bar and copy to the clipboard.
If you've captured a screen to the clipboard, open Preview and then do cmd-n. Preview will open your screenshot image. Further new screenshot images will open in new Preview windows.
If you'd like to change the default image file format for screenshots, here's how:
http://bit.ly/1OAUmyX
http://www.computerworld.com/article/2476025/mac-os-x/os-x--taking-better-screenshots-on-a-mac.html
The main screen grabs are these, but do look at the full article, it's so informative.
If you'd like to change the default image file format for screenshots, here's how:
http://bit.ly/1OAUmyX
Thursday, 1 January 2015
Batch rename files using Finder
This is a really handy tip. Maybe you want to rename a load of images or other files with a title and sequential numbers?
In Yosemite, OS10.0, all you have to do now is select some files, right click on one and choose Rename [x] items. You can then tailor the new filenames to what you want. Amazing. There are other handy options such as making a new folder to contain the selected files.


In Yosemite, OS10.0, all you have to do now is select some files, right click on one and choose Rename [x] items. You can then tailor the new filenames to what you want. Amazing. There are other handy options such as making a new folder to contain the selected files.
Tuesday, 25 November 2014
Yosemite - MacBook Pro unusably slow, now fixed
I installed Yosemite on my MacBook Pro only to find it almost unusably slow. My MacBook Air had been fine with Yosemite, better if anything.
Ha! I have now managed to restore it to a good speed.
Specs:
MBPro, 13 inch, mid 2012, 4GB memory, 2.5 GHz processor, 500 GB hard drive of which 108 GB free.
Air: 11 inch, late 2010, 4 GB memory, 1.6 GHz processor, 120 GB flash storage of which 18 GB free.
You'd think the MacBook Pro would be better, but no, the MacBook became so slow it was unusable, while the Air was fine.
So to fix the MacBook Pro, an online search found this useful advice: http://www.hightechdad.com/2014/10/23/13-tips-optimize-mac-yosemite-installation/
The HighTechDad (cheek! listen to this HighTechMum) had found the same slowdown as me, and his was a higher spec. MacBook Pro. He suggested 13 possible steps, this is my experience with the most useful ones:
1), 2) Repair permissions and Check disk for errors, run Onyx. Download here. This free tuneup programme will check your hard drive, repair permissions, delete temporary files and generally clean up your system. Running Onyx improved things but the laptop was still unusably slow.
3) Reset the System Management Controller
"I believe that this (in conjunction with a few other things) truly fixed my issue. If your fans on your MBP are running all of the time, it’s probably worth doing this. Read this Apple Support Article that tells you how to do it on different Macs – http://support.apple.com/kb/ht3964. Basically, here are the steps you can do on a MacBook Pro:
Ha! I have now managed to restore it to a good speed.
Specs:
MBPro, 13 inch, mid 2012, 4GB memory, 2.5 GHz processor, 500 GB hard drive of which 108 GB free.
Air: 11 inch, late 2010, 4 GB memory, 1.6 GHz processor, 120 GB flash storage of which 18 GB free.
You'd think the MacBook Pro would be better, but no, the MacBook became so slow it was unusable, while the Air was fine.
So to fix the MacBook Pro, an online search found this useful advice: http://www.hightechdad.com/2014/10/23/13-tips-optimize-mac-yosemite-installation/
The HighTechDad (cheek! listen to this HighTechMum) had found the same slowdown as me, and his was a higher spec. MacBook Pro. He suggested 13 possible steps, this is my experience with the most useful ones:
1), 2) Repair permissions and Check disk for errors, run Onyx. Download here. This free tuneup programme will check your hard drive, repair permissions, delete temporary files and generally clean up your system. Running Onyx improved things but the laptop was still unusably slow.
3) Reset the System Management Controller
"I believe that this (in conjunction with a few other things) truly fixed my issue. If your fans on your MBP are running all of the time, it’s probably worth doing this. Read this Apple Support Article that tells you how to do it on different Macs – http://support.apple.com/kb/ht3964. Basically, here are the steps you can do on a MacBook Pro:
- Turn off your Mac
- Plug in your Mac power cord into the wall socket
- Hold down the Left Shift + Option + Control + Power Button, simultaneously, for about 10 seconds
- By holding these keys pressed, your Mac won’t power on but the reset will be done.
- Release all keys after about 10 seconds and turn on and run your Mac like you normally do."
4) Reset PRAM
"Here is the Apple Support Article for Yosemite – http://support.apple.com/kb/PH18761. I believe this helped with my issues. Here are the basic steps:"
- Turn off your Mac
- Press the power button and at the same time -
- Press Command + Option + P + R in combination, all together
- Press and hold all these keys until you hear the startup Boing - wait to hear it twice, this means the PRAM has been reset
- Release the keys
- The computer will finish restarting and your PRAM reset should be complete.
5) Reduce transparancy
No, I don't know when it uses Transparancy ... but apparently this takes up graphic processing time, so worth a try. Apple menu > System preferences > Accessibility then check Reduce transparency.
6) Turn off File Vault
I don't use that but if you do, apparently it can slow things down a lot so switch off if you can. Apple menu > System preferences > Security & Privacy > File Vault.
7) Reduce Spotlight items.
I don't use Spotlight, I prefer just Cmnd + F from the desktop, a simpler Find window. But if you do, go to Apple menu > System preferences > Spotlight and you can switch off any of the items it searches for that you don't think useful.
Certainly improved but not enough, so finally, I bought 16 MB of RAM from Crucial Computers (cost £122) and installed it myself (go on, it's really easy, but you might want to order the fitting kit at the same time to get the Phillips 00 screwdriver).
Two days later - my MacBook Pro is fine, really speedy. A long struggle but a moment of triumph.
Certainly improved but not enough, so finally, I bought 16 MB of RAM from Crucial Computers (cost £122) and installed it myself (go on, it's really easy, but you might want to order the fitting kit at the same time to get the Phillips 00 screwdriver).
Two days later - my MacBook Pro is fine, really speedy. A long struggle but a moment of triumph.
Friday, 14 November 2014
Apple OS 10.10 Yosemite - get rid of DropBox green ticks
I've finally decided to install Yosemite - I skipped Mavericks to allow a few bugs to be eliminated.
Now to customise it to what I prefer - that is, the best of the old with the best of the new.
Here is how to get rid of this distracting feature. Thanks to the Apple user discussion, referencing this link: http://www.mrh.is/writing/about/how-to-get-rid-of-the-new-dropbox-checkmarks
Now to customise it to what I prefer - that is, the best of the old with the best of the new.
DropBox
If you depend on DropBox, as I do, you will instantly see that your list of files has acquired a column of garish bright green ticks, indicating that DropBox has synchronised the file. What a horrible idea!Here is how to get rid of this distracting feature. Thanks to the Apple user discussion, referencing this link: http://www.mrh.is/writing/about/how-to-get-rid-of-the-new-dropbox-checkmarks
- Download the latest DropBox app, from the DropBox website. Follow instructions to install it.
- Open your Applications folder and find the DropBox app.
- Right click on the DropBox app and select Show package contents.
- When the folder opens, click the down arrow to show the files and folders. Find Plugins and click to show what's in that.
- See garcon.appex and again, right click to Show package contents and open the Contents folder.
- Then in the Resources folder, click the down arrow to show the contents.
- You will see the offending green tick, named overlay-uptodate.icns
- Rename that file either by right clicking on it, or by clicking slowly, - I called it overlay-uptodate-old.icns .
- Close all those folders.
Monday, 10 November 2014
How to revert to iTunes 11 if you don't like iTunes 12
Some reviewers think iTunes 12 is "Apple's worst software ever" because of the visually incoherent way it presents information on your media collection - in particular, the complete lack of the sidebar, where media were listed by category.
I agree - but luckily, if you have accepted the iTunes 12 "upgrade" you can fairly easily go back to iTunes 11. Here are very clear instructions, from MacWorld repeated on the LifeHacker blog.
- Actually, not quite! Where is my iTunes music and media? Apple support gives the following instructions for retrieving it:
1. Quit iTunes.
2. Locate your iTunes folder (this is the folder that contains the iTunes Library and iTunes Library.xml files).
3. Open your iTunes folder.
4. Drag the "iTunes Library.xml" or "iTunes Music Library.xml" file to the Desktop. If neither is available, learn how to add files back to the Library (because the XML file is not available, playlists and other information will not be available).
5. Drag the following file from your iTunes folder to the Trash:
6. Open iTunes.
Important: Do not add any content into iTunes at this point (such as by purchasing something from the iTunes Store).
7. Choose File > Library > Import Playlist.
8. Navigate to the "iTunes Library.xml" file on the Desktop.
Hooray, it's all back.
Doubtless Apple will try to "upgrade" you to iTunes 12 with every software update. Click Details instead of automatically accepting and you'll be able to avoid the horrid thing.
I agree - but luckily, if you have accepted the iTunes 12 "upgrade" you can fairly easily go back to iTunes 11. Here are very clear instructions, from MacWorld repeated on the LifeHacker blog.
First off, download copies of AppZapper and Pacifist , backup your computer, then create an installer with Pacifist. (Pacifist allows you to unpack .dmg installation packages and extract individual files and folders. Not something one needs to do every day! but in this case it's just the job.)
- Quit iTunes 12 and launch AppZapper
- Open AppZapper's preferences and uncheck"Keep Apple Applications Safe"
- Drag the iTunes 12 icon from the Application folder to AppZapper and click the "Zap!" button
- Download iTunes 11 - from the Apple support site
- Open up Pacifist and drag the iTunes 11 DMG file into it.
- Select "Contents of Install iTunes" and then click "Install"
- Navigate to your iTunes folder. Within that find the iTunes library and then find the iTunes LIbrary.itl file. Drag it to your desktop or to the trash.
- Launch iTunes 11.
- Actually, not quite! Where is my iTunes music and media? Apple support gives the following instructions for retrieving it:
Re-creating the iTunes Library file
Note: After re-creating your library, any devices that you sync with iTunes (Apple TV, iPod, iPhone, iPad) will see your iTunes library as a new library and will completely resync. The next sync with such a device will take longer and may reset some options since your rebuilt library isn't familiar to the device.1. Quit iTunes.
2. Locate your iTunes folder (this is the folder that contains the iTunes Library and iTunes Library.xml files).
| Operating System | Default location of iTunes Folder |
|---|---|
| Mac OS X | /Users/[your username]/Music |
| Microsoft Windows XP | \Documents and Settings\[your username]\My Documents\My Music\ |
| Microsoft Windows Vista | \Users\[your username]\Music\ |
| Microsoft Windows 7 | \Users\[your username]\My Music\ |
4. Drag the "iTunes Library.xml" or "iTunes Music Library.xml" file to the Desktop. If neither is available, learn how to add files back to the Library (because the XML file is not available, playlists and other information will not be available).
5. Drag the following file from your iTunes folder to the Trash:
| Mac OS X | "iTunes Library" or "iTunes Library.itl" |
| Microsoft Windows | "iTunes Library.itl" |
Important: Do not add any content into iTunes at this point (such as by purchasing something from the iTunes Store).
7. Choose File > Library > Import Playlist.
8. Navigate to the "iTunes Library.xml" file on the Desktop.
- Mac users: Click Choose.
- Windows users: Click Open.
Hooray, it's all back.
Doubtless Apple will try to "upgrade" you to iTunes 12 with every software update. Click Details instead of automatically accepting and you'll be able to avoid the horrid thing.
Tuesday, 4 November 2014
Locked out after Mac OS update
Every time I update Mountain Lion and restart my MacBook Air it refuses to recognise my password.
If this happens there is a long way round to get it to open up and a quick, short way. Yes, guess which I tried first:
1. Boot in Recovery system. Press and hold the Command and R keys while you start or restart.
2. When restarted, click Utilities in the top menu bar and select Terminal from the dropdown menu.
3. When Terminal starts, type
resetpassword
and press Return.
4. Then respond to the dialogue boxes to reset your password. You can use the one you had before if you can remember it.
Okay, what's the easy way?
Try to Restart using the restart button in the usual way.
When you get the choice of user identities click on yours and enter your password. If it's refused three times you'll be offered the chance to reset it using your Apple identity. Easy!
If this happens there is a long way round to get it to open up and a quick, short way. Yes, guess which I tried first:
1. Boot in Recovery system. Press and hold the Command and R keys while you start or restart.
2. When restarted, click Utilities in the top menu bar and select Terminal from the dropdown menu.
3. When Terminal starts, type
resetpassword
and press Return.
4. Then respond to the dialogue boxes to reset your password. You can use the one you had before if you can remember it.
Okay, what's the easy way?
Try to Restart using the restart button in the usual way.
When you get the choice of user identities click on yours and enter your password. If it's refused three times you'll be offered the chance to reset it using your Apple identity. Easy!
Sunday, 5 October 2014
WiFi secrets revealed
I've joined a new broadband and phone provider. New ISP, new modem - and this one seems to be noticeably slower than its predecessor. So I checked my earlier blog about wifi problems, and opened up Apple's Wireless Diagnostics.
 Last time I ran this application there were lots of interesting charts and information about one's wifi connection. Now, they seem to have disappeared with only a boring screen telling one all is well (or, I suppose, not).
However, I found a clue elsewhere online. The discussion refers to Mavericks but I'm running Mountain Lion - same applies.
Bizarrely, with Wireless Diagnostics open, go to the top menu bar and click Window > Utilities. You get a new window with all the previous ways to allow you to obsess about your wifi setup.
Oh dear, my Performance chart is not looking good - apparently signal (RSSI) should be a lot stronger than noise (makes sense), at least -25 between the numbers, while mine has barely -10.
I can see hours of "fun" coming up trying to sort this out. Watch this space.
Last time I ran this application there were lots of interesting charts and information about one's wifi connection. Now, they seem to have disappeared with only a boring screen telling one all is well (or, I suppose, not).However, I found a clue elsewhere online. The discussion refers to Mavericks but I'm running Mountain Lion - same applies.
Bizarrely, with Wireless Diagnostics open, go to the top menu bar and click Window > Utilities. You get a new window with all the previous ways to allow you to obsess about your wifi setup.
Oh dear, my Performance chart is not looking good - apparently signal (RSSI) should be a lot stronger than noise (makes sense), at least -25 between the numbers, while mine has barely -10.
I can see hours of "fun" coming up trying to sort this out. Watch this space.
Monday, 15 September 2014
Sound lost on iMac
This iMac is not very new! So when it ceased to emit sound other than the startup chord I wondered if something had died inside it.
I have a pair of external speakers plugged in, so first I tried unplugging those. For a while, music flowed out of the tinny internal speakers, but next day - silence reigned again.
So,
I have a pair of external speakers plugged in, so first I tried unplugging those. For a while, music flowed out of the tinny internal speakers, but next day - silence reigned again.
So,
- tried restarting the computer - no change. Opened System Preferences > Sound, nothing appeared wrong.
- Okay next most simple answer - unplug and replug. When I'd unplugged and replugged the audio speaker jack in the headphone socket a couple of times - Yes! Fixed!
- En route to this happy result, I also checked System Preferences > Sound again and found that the Mute button at the bottom of the window had got ticked. Well, unticking that doubtless helped.
Monday, 4 August 2014
Ebooks - best prices or free
I just discovered two fantastically useful applications / apps, invaluable if you read ebooks.
After initial optimism I found this is true, so far, for paid-for books. I cautiously acquired a couple of free ebooks from the iTunes Store - these are fine, you can transfer them around and read them on whatever device. Your book gets downloaded into your iTunes music library (under books) as an Adobe Digital Editions epub file.
Reassured, then I paid for one. The ebook seemed to open in Adobe Digital Editions and transferred into Calibre and on to my Kobo but alas, it is blank. The DeDRM tools don't work on it. So least expensive, yes, but so far very restricted use unless it's a free book.
Luzme
First, Luzme.com, you can search for ebooks by title, author, ISBN etc and compare the prices. You can instantly buy the book, or add it to a watch list to get an email notice if the price changes. It turns out there huge differences between online bookstores. You see a little chart of price changes for each ebook store, too.BitLit
Second, BitLit - from Canada - allows you to purchase an ebook version of a book you already own, free or at a reduced price. Smartphones only for this one. You scan the cover at a set angle, and then the copyright page to which you have added your name. BitLit is signing up publishers fast so your particular book may not yet be available.Apple's iTunes Books
Luzme revealed that Apple (iTunes) was the least expensive source of one or two ebooks. I haven't tried Apple before as a source, but I duly did. However, iTunes warns you that you can only read your downloaded book on an iOS device, not even on your desktop Mac.After initial optimism I found this is true, so far, for paid-for books. I cautiously acquired a couple of free ebooks from the iTunes Store - these are fine, you can transfer them around and read them on whatever device. Your book gets downloaded into your iTunes music library (under books) as an Adobe Digital Editions epub file.
Reassured, then I paid for one. The ebook seemed to open in Adobe Digital Editions and transferred into Calibre and on to my Kobo but alas, it is blank. The DeDRM tools don't work on it. So least expensive, yes, but so far very restricted use unless it's a free book.
Calibre ebook library and software
Just to remind you about the superb Calibre -To manage your ebooks library and reader content using Calibre
Calibre is a generic ebooks management application, very handy, search to download it for free (be fair, do donate). Using Calibre you can:- manage the books on your ereader
- assemble all your ebooks from whatever source in one folder
- read them on your desktop
- automatically convert books from different formats for your own ereader, whatever that is
and much much more besides which I haven't tried out.
To set up Calibre to automatically convert books for upload
- Downloaded and instal Calibre
- Install the DeDRM plugins that you have already obtained
- Go to Calibre's Preferences (under Calibre in the top menu)
- Under Advanced, click Plugins
- Select Load plugin from file
- Navigate to the downloaded folder of Tools
- In the sub folder inside that, Calibre plugins, click and load each of the zip files in turn
- Click the green Apply tick, top left - Repeat until all are installed. Restart Calibre.
Wednesday, 19 March 2014
Watch BBC iPlayer via iPhone + Apple TV
Don't want to tie up your Mac streaming BBC iPlayer to your Apple TV? Easy, use your iPhone instead. Turn on AirPlay mirroring in your iPhone to stream direct to the Apple TV.
You need -
You need -
- An iPhone 4s or later (or iPad 2, iPad mini, iPod touch)
- Apple TV 2nd or 3rd generation
What to do
- Download the BBC iPlayer app from the app store
- Make sure both the iOS device and the Apple TV are connected to the same WiFi network
- Swipe from the bottom of the screen to show the Control Centre.
- AirPlay is just above the 4 icon buttons at the bottom. Tap to turn on AirPlay.
- Next screen - select the Apple TV to mirror to, then switch on mirroring.
Wednesday, 26 February 2014
Five nice apps for your Mac
 Five incredibly useful applications, I use them all the time. Free or worth the low cost.
- Thunderbird (free) - A free open source email client from Mozilla that's streets ahead of Mail imho.
- VLC Player (free but donate) - I expect you know this. Play music without all the total domination of iTunes, play almost any format video file.
- Airfoil ($25) - if you don't have Airplay on your Mac, Airfoil does the biz. Plug your iPhone or iPod into your radio, speakers, whatever, and transmit whatever you're playing on your Mac to the radio, speakers etc.
- TotalFinder ($18) - Finder windows open in tabs, just like in Chrome or FireFox. Yes, Mavericks does that too, but I prefer the upward tabs to Maverick's downward ones as in Safari. Also the Mavericks version seems more complicated and less intuitive. Folders on top of the file list, just like in Windows (ssss...) Easily show system files ...
- Web Snapper (£10.49) - Capture web pages as pdf files (or a range of other formats), just as you see them on the screen.
Saturday, 22 February 2014
Time Machine - change backup interval
Time Machine can be a life saver - but do you really need backups every hour? I've got a big external hard drive and it really slows my Mac down when it starts its backups, always at the most inconvenient time.
Change the frequency! It's easy. There are two little applications that will let you do this, such as -
TimeMachineEditor (free).
Reviews say this is very easy to use (it is, I have) but there are some warnings - if your Time Machine backup drive is not available or if Time Machine is turned off you get confusing warning messages.
TimeMachineScheduler (donate).
Reviews - this one scores better than TimeMachineEditor, but there seem to be more problem reported.
Or, you can open Time Machine preferences and switch it to Off - but remember to switch it on again at intervals.
Change the frequency! It's easy. There are two little applications that will let you do this, such as -
TimeMachineEditor (free).
Reviews say this is very easy to use (it is, I have) but there are some warnings - if your Time Machine backup drive is not available or if Time Machine is turned off you get confusing warning messages.
TimeMachineScheduler (donate).
Reviews - this one scores better than TimeMachineEditor, but there seem to be more problem reported.
Or, you can open Time Machine preferences and switch it to Off - but remember to switch it on again at intervals.
Subscribe to:
Posts (Atom)
